Brownie Sundae Nutella Cupcakes

Craving chocolate and seeing that Cupcake Project and Cuisinart were hosting an ice cream cupcake contest meant it was time to get in the kitchen and get creative with some delicious ingredients! For this fun contest you had to create a cupcake using a frozen element so I decided to use one of my all-time favorite frozen treats, frozen custard. Since I don't have a Cuisinart ice cream maker I doctored up store bought vanilla frozen custard by adding Nutella, brownie pieces and chocolate drizzled sugar cone bits. Whoever wins the contest gets a fabulous prize pack of items that includes a Cuisinart ice cream maker!! I can't wait to dream up frozen custard and ice cream flavors that I can then make from scratch if I win! Get ready to learn how to make ice cream cupcakes. This recipe is decadent, fun, full of tasty things AND easier to make than it looks...really!
The ice cream cupcakes I had in my mind where going to be pretty substantial. I knew the cupcake base needed to hold up to all of the toppings that were going to be added. Brownies were the best choice since they are sturdier than traditional cake cupcakes...and let's face it who doesn't love a rich dark chocolate brownie?! I added chopped hazelnuts to my brownies to make them even more decadent. Our small dessert cups and medium dessert cups were used to bake the brownies in since the paper is thicker than traditional cupcake liners. Making two sizes also meant having two fun ways to decorate the ice cream cupcakes!

While brainstorming I wanted to think of a clever way to incorporate the frozen custard into the brownie, yet have it be slightly contained. Then it hit me…sugar cones! With a slight modification I knew they would be perfect. Did you know you can cut sugar cones with scissors? I came up with ideas on how to use all of the pieces, even the little broken bits.

These cupcakes might look complicated but really they are not. Using a few doctored up store bought ingredients you can whip up this decadent ice cream brownie cupcake up in about an hour..maybe less depending on how picky you are with the decorations. As gourmet cupcake recipes go, this one takes the cake...or cupcake we should say! These would be a show stopper at any party since they look like you've spent all day making them!

Tip: read through each step before making.
Step 1: Brownie Cupcake Base
Ingredients:
Ghirardelli Dark Chocolate Brownie Mix + ingredients listed on package needed to make them
1/4 cup finely chopped hazelnut pieces
small baking cups
medium baking cups
Instructions: Preheat oven to 325 degrees. Mix the brownie mix per package instructions and fold in the chopped hazelnuts. If you are using free standing baking cups like ours this recipe will make 6 large and 6 small. Place the baking cups on a baking sheet. If you are making 2 sizes, place each size on their own baking sheet since the small size take less time to bake. Using a 1.5 tablespoon cookie scoop add 2 scoops of the batter to the large baking cups and 1 scoop to the small. In my oven the small size took about 20 minutes and the large took 30 minutes.
Step 2: Sugar Cone Prep
Ingredients:
6 sugar cones
1/4 cup dark chocolate (we used Merkens since it melts easily and drizzles well)
dark chocolate vermicelli sprinkles or sprinkles of choice
hot fudge sauce - needed for later steps
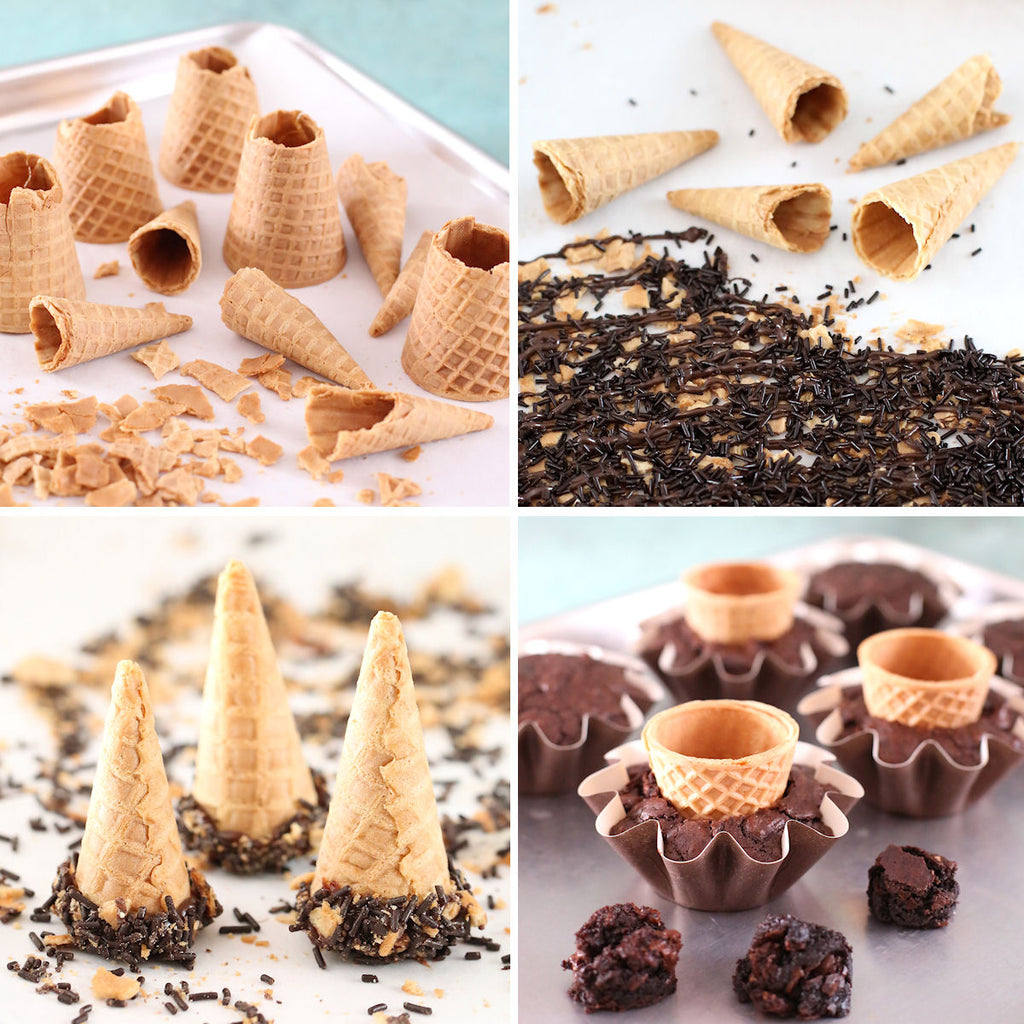
While the brownies are baking take 6 sugar cones and cut them about 2.25" of the way down with a clean pair of kitchen scissors. Some pieces may break and that is okay since we will be using them for the sugar cone bits topping. Set aside the top and small tip of the cone.
Take the broken sugar cone pieces and crumble them into smaller bits. If you don't have around 1/2 cup of pieces you can break up another sugar cone as you will be adding the sugar cone bit topping to the frozen custard and using it as a garnish on the brownie cupcakes. Spread the sugar cone pieces on a sheet of parchment paper. Place the dark chocolate in a quart size freezer bag and melt in the microwave for 1 minute on 50% power. If the chocolate is not fully melted heat for 20 more seconds on 50% power, repeat until fully melted. Snip off a tiny piece of the corner off the bag and drizzle the chocolate over the sugar cone pieces. Add vermicelli dark chocolate sprinkles (or sprinkles of choice) to the chocolate before it sets up and set aside to let harden. Once hardened break up the pieces to create the crumble topping.
Large Brownie Sundae Nutella Cupcake Assembly
By this time the brownies might be ready to come out of the oven. Set aside the small size brownies. While the larger brownie cupcakes are still warm from the oven take the top larger piece of the sugar cone and carefully press it completely down into the brownie. Gently give it a little twist like you would do with a cupcake corer. Pull the cone back out of the brownie and push the brownie piece that is now inside the cone out, set aside for the frozen custard mixture. Place the sugar cone back into the brownie cupcake. Do this to all of the larger brownie cupcakes. Add a tablespoon of hot fudge into the cavity of the sugar cookie cone in the brownie. The hot fudge does not need to be heated for this step. Now it is time to make the frozen custard mixture to fill the sugar cones that are in your brownies!
Step 3: Nutella Brownie Cone Crumble Frozen Custard
Ingredients
1 qt of Edy's vanilla frozen custard (you will only use about 1/3)
Nutella
brownie pieces that you took out of the sugar cones
1/4 cup sugar cone crumb topping that you made earlier
Slightly soften the frozen custard. Scoop out about 1/3 of the container into a small mixing bowl. Add about 1/4 cup of sugar cone crumbles you made earlier, a few tablespoons of Nutella and the reserved brownie pieces from the sugar cones (broken into smaller pieces) to the frozen custard. Mix until combined. Scoop the frozen custard mixture into the cavities of the sugar cones. Fill until you reach the top of the cone and use a knife level the custard to the top of the cone. If the custard has become too soft place the brownie cupcakes in the freezer until they firm up or until serving. Place the extra frozen custard back in the freezer to use with the small brownie cupcakes. Note: this is not an exact recipe. If you like a lot of toppings add more, if you like less only add in what you want.
When you are ready to serve your Brownie Sundae Nutella Cupcakes pull them out of the freezer. Place a few tablespoons of hot fudge sauce in a quart size freezer bag and heat in the microwave for 30 seconds on 50% power. You only need to soften it slightly. Snip the corner of bag off. Squeeze the hot fudge sauce onto the top of the brownie to cover it as shown in one of the pictures above. Add some of the sugar cone topping. For the top of the cone sticking out of the brownie add some dark chocolate vermicelli sprinkles or more of the sugar cone topping. Top with a Ferrero Rocher hazelnut chocolate to finish. If you are not eating them immediately place them back in the freezer until 5 to 10 minutes before serving.
You may need a fork and a knife to eat them or just go for it and use your hands! See below on how to make the small versions that have a few less steps but are just as delicious!

Small Nutella Brownie Sundae Assembly
Take the small bottom tip of the sugar cones that you haven't used yet and fill with Nutella. Roll the Nutella filled end of the cone into some of the sugar cone topping and set aside. Take the small brownie cupcakes you made earlier (if you made two sizes) and drizzle a little of hot fudge sauce on top of the brownie. Sprinkle with some of the sugar cone bit toppong. Using a small ice cream scoop place a scoop of the hard frozen custard you made on top of the brownie. Place a Nutella filled cone on top of each brownie. Serve immediately or place in the freezer until serving.
We hope you enjoy our decadent Brownie Sundae Nutella Cupcakes and try making them yourself! If you love cupcakes and ice cream you too can enter the fun contest Cupcake Project and Cusinart are putting on. Click here to find out how to enter. Deadline is August 15th!
Cheers!
Esther
This post was created, written, styled and photographed by Esther of The Bakers Party Shop. If you share a photo from our post a link must be displayed back to this post and credit given to The Bakers Party Shop. All photos and content are copyright of The Bakers Party Shop & The Bakers Confections, All rights reserved 2015.
yum yum for the tum tum
These are adorable and look SO yummy!
These are SO creative! Plus, they look like they would be easy to make and sound incredible!! What a great entry! Good luck!!
That is way creative and looks SO delicious! Good luck!
Leave a comment